Stone bridge, swing bridge, suspension bridge.
Learning piano technique can be a bit daunting…
There are many contradictory techniques on piano technique throughout history and in current use today. It’s hard to know where to look for a one stop shop on technique. For me the Alexander Technique and the Dorothy Taubman Technique, working in tandem, make the most logical and anatomical sense.
Please note I a not a trained Alexander or Dorothy Tubman instructor. I just want to introduce you to their ideas.
To simplify piano technique, I like to remember three types of bridges.
- A stone bridge refers to the correct bone structure of your hands (Alexander Technique). Playing with “curved fingers” is the primitive version. Our stone bridge is a little more precise.
- A swing bridge refers to the way we move to press down a key (Dorothy Taubman Technique). Not to isolate fingers the way Hanon Technique suggests.
- A suspension bridge, refers to the alignment of the back and chest, allowing the whole body to work together as one to create infinite variations of sound (Alexander Technique).
Let’s start with a stone bridge.
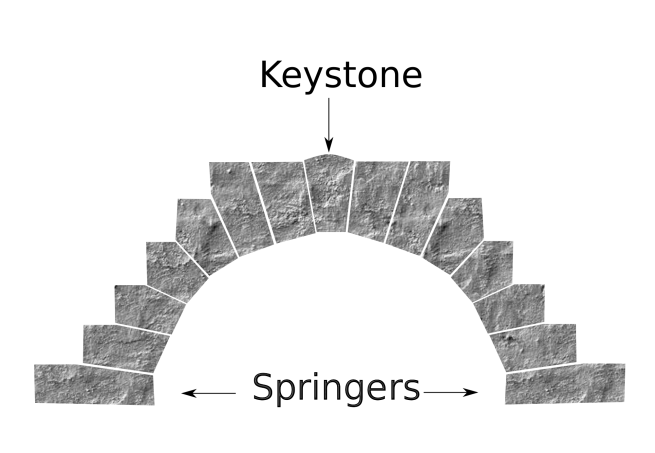
Think of an arching stone bridge, with it’s keystone positioned highest in the centre of the bridge. Each block of stone is positioned end to end so that each block transfers force from one block into the next block and eventually down into the ground at each end block (the “springers” in the image above).
Now think of you hands. Let them dangle freely at your sides. Slowly bring your hands up to the piano (or computer desk) and try to keep your same, freely dangled arch. Place your fingertips on the surface and keep the pointy end of your elbow level with your fingertips. These are your two end blocks. You might now start to notice that the knuckles of your hand act like the keystone in an arch bridge. The underside of the arch is at it’s furtherest from the imaginary water underneath at about where your wrist is. But make sure your wrist is not higher that the keystone of your knuckles. Wrist to knuckles should be almost level, with knuckles slightly higher.
Congratulations! You have constructed your first bridge. Now continue to keep your bones in that structure whenever you play. Playing with sunken knuckles, or raised wrists or flattened fingers looses the beautiful advantage you have of being able to play with natural strength at no extra cost to any muscles or tendons. We’re aiming for an economy and ease of playing. Piano playing should be euphoric and stress free. There is no need to build stamina, or cultivate strong muscles when playing piano. There are NO muscles in your fingers. So old fashioned techniques like isolating fingers, and lifting them up one by one the way Hanon prescribes is unnecessary. 4th fingers will always be considered weak if you are mechanically isolating and lifting your fingers. Your 4th finger feels weird for a reason. It will also be a cause of much forearm pain.
Here’s a great video from Dr. John Mortensen, Professor of Piano at Cedarville University to help explain better.
Now onto the next bridge.
Hear is where we learn how to turn a beautifully supported, but somewhat static stone bridge into a movement that will allow your stone bridge to press down keys.
Let’s move onto the swing bridge now.
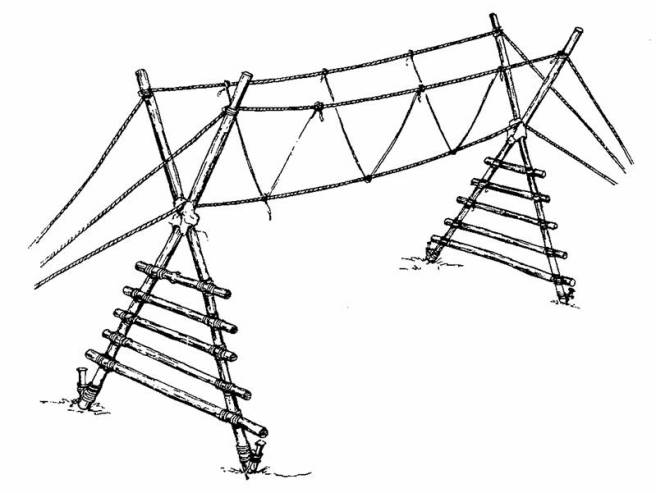
Think of a very simple swing bridge. Maybe you’re on a bush walk and you come across a river with a very simply designed swing bridge. A long cable along the bottom and two horizontal cables on either side as railings to hold onto. There would also be many cables attached from the bottom cable at the base and reaching to the two horizontal cables to on the sides to connect everything together. Now think of your hand not as a bridge, but as a person walking across that bridge. Imagine your right hand thumb to be your entire left arm and imagine your right hand 5th finger to be your entire right arm. As you walk along the bridge you have to alternate lifting each arm off the railing to reach the cable on the other side. Remember this is a swing bridge so everything is very shaky! Try alternating between playing your thumb and your 5th finger by using this rocking/rotating movement.
If you’ve never walked on a swing bridge before it might be best to switch your thinking to a big brass door handle. Think of those 1990s style big brass handles the shape of a tennis ball. Now imagine turning the door handle so that your right hand thumb moves from the left hand side of your hand to the right hand side as you turn the handle 180 degrees. And vice versa with the 5th finger. This is the type of rotation we like to use when playing piano.
You are actually creating this rotational movement from your elbow. Anatomically speaking, you are rotating your radius bone, while the ulna bone interlocks with the humerus bone and stays still. The radius bone is the forearm bone that is in line with your thumb. The ulna bone is your second forearm bone in line with your 5th finger. The humerus is your upper arm bone. So when we play the piano with beautifully arched fingers we use this type of rotation (but on a very small scale) to activate the transfer of weight down onto specific keys. Gravity from this rotational movement allows us to make sound.
We can also simply use our elbow joint to raise the forearm and then let it fall with gravity to play notes, but when we need to play many notes across the piano (like scales) we need to call upon this rotation technique to play key after key.
The Dorothy Taubman technique explains this further. In essence we have two types of rotation to use when playing scales. Single rotation and double rotation. Single rotation occurs when alternating weight between the left and right hand side of one hand, like a simple C to G pattern. Double rotation needs to be utilized when playing some notes of a scale. We play our thumb with a swing to the left, our 2nd finger with a swing to the right and now we need to swing the 2nd finger back to the left again, giving it a preparatory swing into being able to play our 3rd finger with a swing to the right again. If this sounds too confusing please watch the video below.
Lastly we have our third bridge, the suspension bridge. This refers to our back and chest.

I’m no mechanical engineer so please bear with me while we imagine building a suspension bridge together!
Firstly imagine the spine in your back as if it were one of the vertical towers of a suspension bridge. Now imagine building a horizontal roadbed for your bridge perpendicular to your tower. Now place this roadbed in the sweet spot where your shoulders aren’t too high or too low.
If you can’t find the sweet spot yet, let’s keep constructing the bridge until you can place it correctly. Next let’s add in two big drooping/looping/hanging cables from each side of top of your vertical tower (your spine) down to the extremes of your horizontal roadbed. And now let’s compete the bridge with many taut, vertical cables connecting those drooping cables to the roadbed. So the roadbed is now supported by many vertical cables attached to drooping cables and not the tower/spine. If we now add in more vertical cables across the underside of our roadbed towards a much lower part of our back and meeting all in one point at the base of our tower, we get cables suspending this roadbed in seemingly mid-air. (Suspension bridges don’t actually use cables from below, but our backs have ‘cables’ (muscles) below our ‘roadbed’ so for the sake of this exercise we’ll add in these cables) Cables from above carry the weight of the horizontal roadbed as do cables from below. Now the trick is to slowly move your shoulders up and down, thinking about your upper shoulder and lower back muscles as if they were cables. Can you find the sweet spot where your roadbed would be positioned so that tension from each taut cable would be at a minimum? This concept of mapping the muscles of you back helps to create a naturally correct back position, shoulder height and arm position, and allows arms to suspended freely from the sides of your torso.
For more information on correct back position and a better description of a suspension bridge 😉 I strongly recommend reading the book What Every Pianist Needs to Know About the Body, by Thomas Mark. He draws heavily on the Alexander Technique to help people map out their bodies and gain greater awareness of what we are all naturally capable of. The Alexander Technique is especially useful for musicians, actors, singers and dancers to gain better control and awareness of their bodies.
